
[ad_1]
The Java Improvement Package (JDK) is certainly one of three core know-how packages utilized in Java programming, together with the JVM (Java Digital Machine) and the JRE (Java Runtime Setting). It is necessary to distinguish between these three applied sciences and perceive how they’re related:
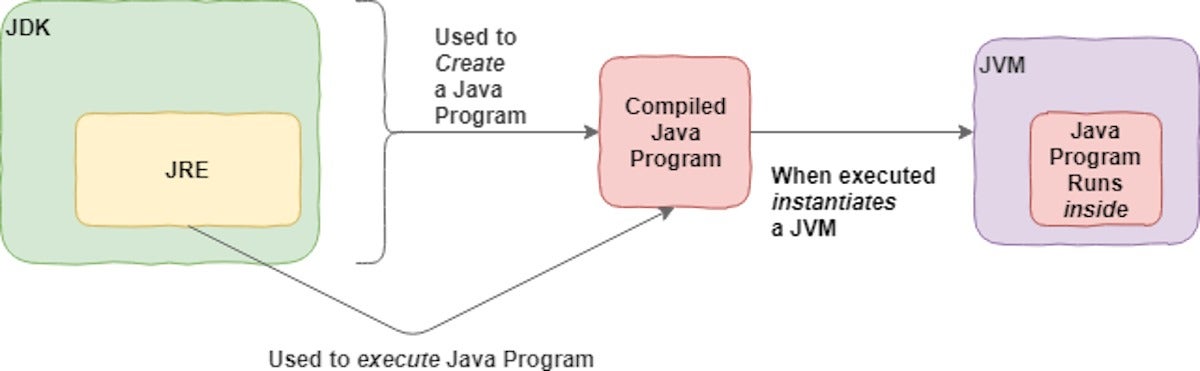
- The JVM is the runtime that hosts working packages.
- The JRE is the on-disk a part of Java that creates the JVM and hundreds packages into them.
- The JDK offers the instruments essential to put in writing Java packages that may be executed and run by the JVM and JRE.
Builders new to Java usually confuse the Java Improvement Package and the Java Runtime Setting. The excellence is that the JDK is a package deal of instruments for creating Java-based software program, whereas the JRE is a package deal of instruments for working Java code.
The JRE can be utilized as a standalone part to easily run Java packages, however it’s additionally a part of the JDK. The JDK requires a JRE as a result of working Java packages is a part of creating them.
Determine 1 exhibits how the JDK suits into the Java utility improvement lifecycle.
 IDG
IDGDetermine 1. A high-level view of the JDK.
Earlier than we transfer on, let’s contemplate the technical and on a regular basis definitions of the JDK:
- Technical definition: The JDK is an implementation of the Java platform specification, which incorporates the compiler and commonplace class libraries.
- On a regular basis definition: The JDK is a software program package deal you obtain as a way to create Java-based functions.
JDK variations and packages
Getting Java arrange in your improvement setting is as straightforward as downloading a JDK and including it to the system path in your working system. For Home windows and macOS, Java contains an installer that may do that for you.
While you obtain your JDK, you will want to pick out the model of Java you need to use. Java 11 has surpassed Java 8 as probably the most generally used model. Trying forward, plainly Java 17 stands out as the subsequent outstanding model. Java maintains backward compatibility, so we’ll simply obtain the newest launch.
Previously, you additionally needed to choose a Java package deal. These had been JDKs focused for various kinds of improvement like Java Enterprise Version (Java EE), Java Customary Version (Java SE), and Java Cellular Version (Java ME). Now that the enterprise Java libraries have migrated to Jakarta EE, the method has modified. You’ll nonetheless obtain the Java SE JDK from an implementer like Oracle or OpenJDK. In the event you want extra instruments helpful for enterprise and cloud-native utility improvement, then you’ll probably need to obtain and set up Jakarta EE. In some instances, you may not want the whole Jakarta EE platform. For instance, when you wanted only a JDK plus servlets, you could possibly use the usual JDK plus Tomcat, which incorporates the Servlet API.
Obtain the JDK for Java SE
We’ll persist with Java SE for this introduction in order that we are able to concentrate on the core JDK courses and applied sciences. To obtain the Java SE improvement package, go to Oracle’s official obtain web page. You will see the varied JDK packages obtainable, as proven in Determine 2.
 IDG
IDGDetermine 2. Out there JDK packages.
Earlier than you choose the Java SE obtain, take a minute to have a look at the opposite choices. There’s rather a lot cooking within the Java kitchen!
The best way to set up the JDK
There are two flavors of JDK set up: guide or installer. In a guide set up, you obtain the binaries, extract them, and add them to the trail. That is widespread with all working methods. You most likely know find out how to carry out such a set up.
Installers can be found for macOS and Home windows. While you run a JDK installer, you’ll be given a choice of three parts: Improvement Instruments, Supply Code, and Public JRE. It’s possible you’ll set up one or all of them. On this case, simply choose the default.
Putting in the Improvement Instruments possibility offers you the JDK correct. Putting in Supply Code comprises the sources for the general public courses within the core Java API. Together with this feature lets you reference the supply code when constructing functions. The third possibility, Public JRE, drives residence that the JDK and JRE are separate entities. The general public JRE can be utilized by different packages to execute Java packages, and may be put in individually from the JDK.
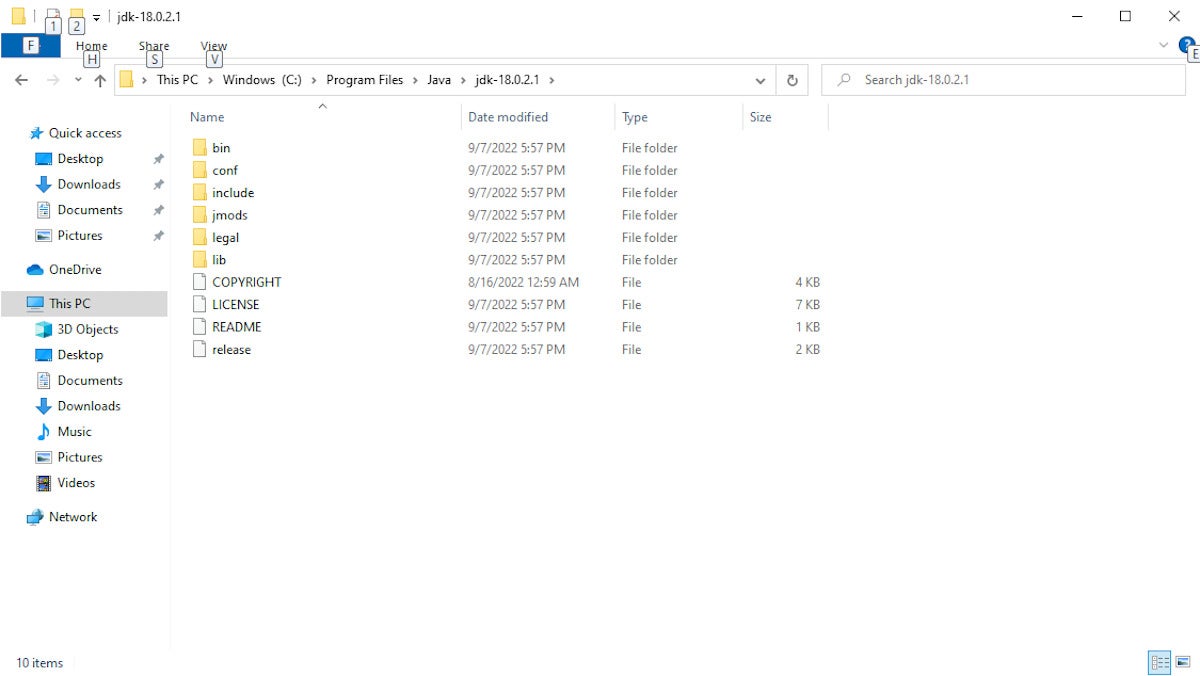
Go forward and set up all three parts and settle for the defaults for every one. Doing this implies your JDK and JRE shall be put in within the default location in your working system. On Home windows, that is C:Program FilesJavajdk-*, as proven in Determine 3. (In older variations of Java, the JDK and JRE had separate directories. In more moderen variations, they’re put in collectively contained in the JDK listing.)
 IDG
IDGDetermine 3. A view of the put in JDK.
Two key Java instructions: java and javac
The JRE inside your JDK provides the java command to your command line. You’ll be able to confirm this by dropping right into a command shell and typing java -version, which ought to return the Java model you’ve got simply put in. (In some instances you will must restart your system for this alteration to your system path to completely take.)
It is good to have java put in, however what about javac? You will want this JDK part to compile your Java information.
The javac command lives contained in the /jdk listing, and in latest variations of the installer will mechanically be added to the trail .... Some IDEs embrace a Java compiler by default. It’s normally potential to configure them to make use of a selected put in model if you want.
Compile and run a Java program
We’ll begin by compiling and working a Java program the old style method—with textual content information and console instructions. This provides us a superb sense of what’s really taking place.
Step 1. Write a easy Java program
Create a brand new textual content file, known as Intro.java and place it someplace in your laptop, like in your paperwork folder.
Subsequent, add the code from Itemizing 1, which is a quite simple Java program.
Itemizing 1. Intro.java
public class Intro {

    public static void most important(String[] args) {
        System.out.println("Welcome to the JDK!");
    }

}
Step 2. Compile with the JDK
Subsequent, use the JDK compiler to show your textual content file into an executable program. Compiled code in Java is named bytecode, and carries the .class extension.
You will use the javac command, passing the Intro.java file because the argument to the command. You’re feeding the Java file we created in Itemizing 1 into the javac command. On my system, that appears like Itemizing 2. (In older Java variations, you’ll must kind the complete path to the command into your command shell as within the commented line.)
Itemizing 2. Compile with the JDK
javac Intro.java
//"C:Program FilesJavajdk-10.0.1binjavac.exe" Intro.java
That ought to end in a profitable compile. The javac is not going to reply with successful message; it’ll simply output the brand new file. Any errors will end in console output.
Step 3. Run the .class file
It’s best to now see the Intro.class file in the identical listing as Intro.java.
You’ll be able to run it by typing: java Intro, which can consequence within the output proven in Itemizing 3. Notice that you do not embrace the .class when typing this command.
Itemizing 3. Working Intro.class
C:UsersmtysonDocuments>java Intro
Welcome to the JDK!
Create a JAR file and add it to your classpath
The javac is the star of the JDK, however the /bin listing comprises different instruments you will want. Most likely probably the most outstanding after javac is the jar software.
A JAR (.jar) file is a packaged set of Java courses. As soon as the compiler has created the .class information, the developer can put them collectively in a .jar, which compresses and constructions them in a predictable vogue.
Let’s convert Intro.class to a .jar file.
Navigate again to the listing the place you positioned your Intro.java, and kind the command you see in Itemizing 4.
Itemizing 4. Create a JAR file
C:UsersmtysonDocuments>"c:Program FilesJavajdk-10.0.1binjar.exe" --create --file intro.jar Intro.class
Now you will see an intro.jar file within the listing. You may make use of the .jar by including it to your classpath and executing this system inside, as proven right here:
Itemizing 5. Add the JAR to your classpath
java -cp intro.jar Intro
The -cp swap tells Java so as to add the jar to the classpath. A .jar file is greater than we want for this tiny program, however they’re indispensable as packages develop in measurement and depend on third-party packages.
The JDK in your IDE
An built-in improvement setting (IDE) is software program that gives a cohesive set of instruments for creating functions. Consider an IDE as a visible working system that features a file browser and textual content editor, together with capabilities particular to improvement like code completion and formatting. Eclipse, IntelliJ, and NetBeans are all well-tested and highly effective Java IDEs. Microsoft’s ubiquitous Visible Studio Code (VS Code) is one other succesful contender for Java utility improvement.
In Java improvement, one of many key issues the IDE does is handle compilation. That’s, the IDE mechanically runs the compile course of within the background so you do not have to repeatedly do it your self. An IDE additionally offers play-by-play suggestions as you go, catching coding errors on the fly.
You have seen how the JDK works on the command line, so now Let’s take a fast take a look at the way it works in Eclipse.
Eclipse and the JDK
Putting in Eclipse is exterior the scope of this information, however it’s a easy course of. Eclipse contains an installer like every other program, and you will discover the suitable installer in your working system right here.
With Eclipse put in, open the Window merchandise from the menu bar and choose Preferences.
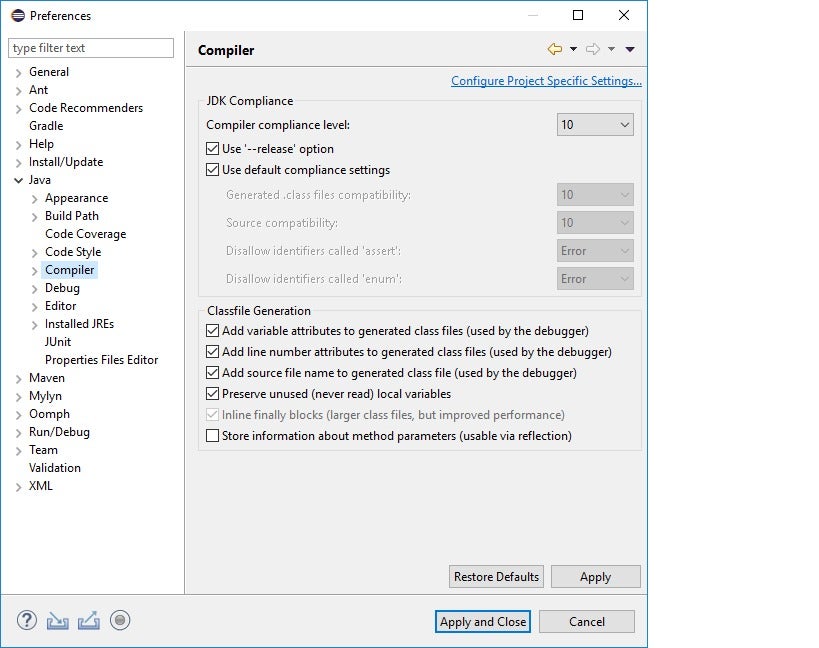
Contained in the Preferences window, you will see the Java merchandise. Open it, and inside you will see the Compiler merchandise. Clicking that may reveal choices for the JDK.
Determine 4 exhibits a screenshot of the JDK choices in Eclipse.
 IDG
IDGDetermine 4. JDK choices in Eclipse.
As beforehand talked about, you will want to pick out the right JDK model in your challenge. Underneath the hood, the IDE will run the JDK compiler, simply as you ran it from the command line. The Eclipse IDE additionally has its personal JDK occasion. The IDE manages the JDK and JRE for you, which makes life a lot simpler!
Copyright © 2023 IDG Communications, Inc.
[ad_2]